
AWS introduced a simple tool for deploying services several years ago, called CodePipeline. Since then they’ve done a lot to make it more powerful. This blog will show you how to take advantage of the power of CodePipeline to build a cross account, cross region pipeline.
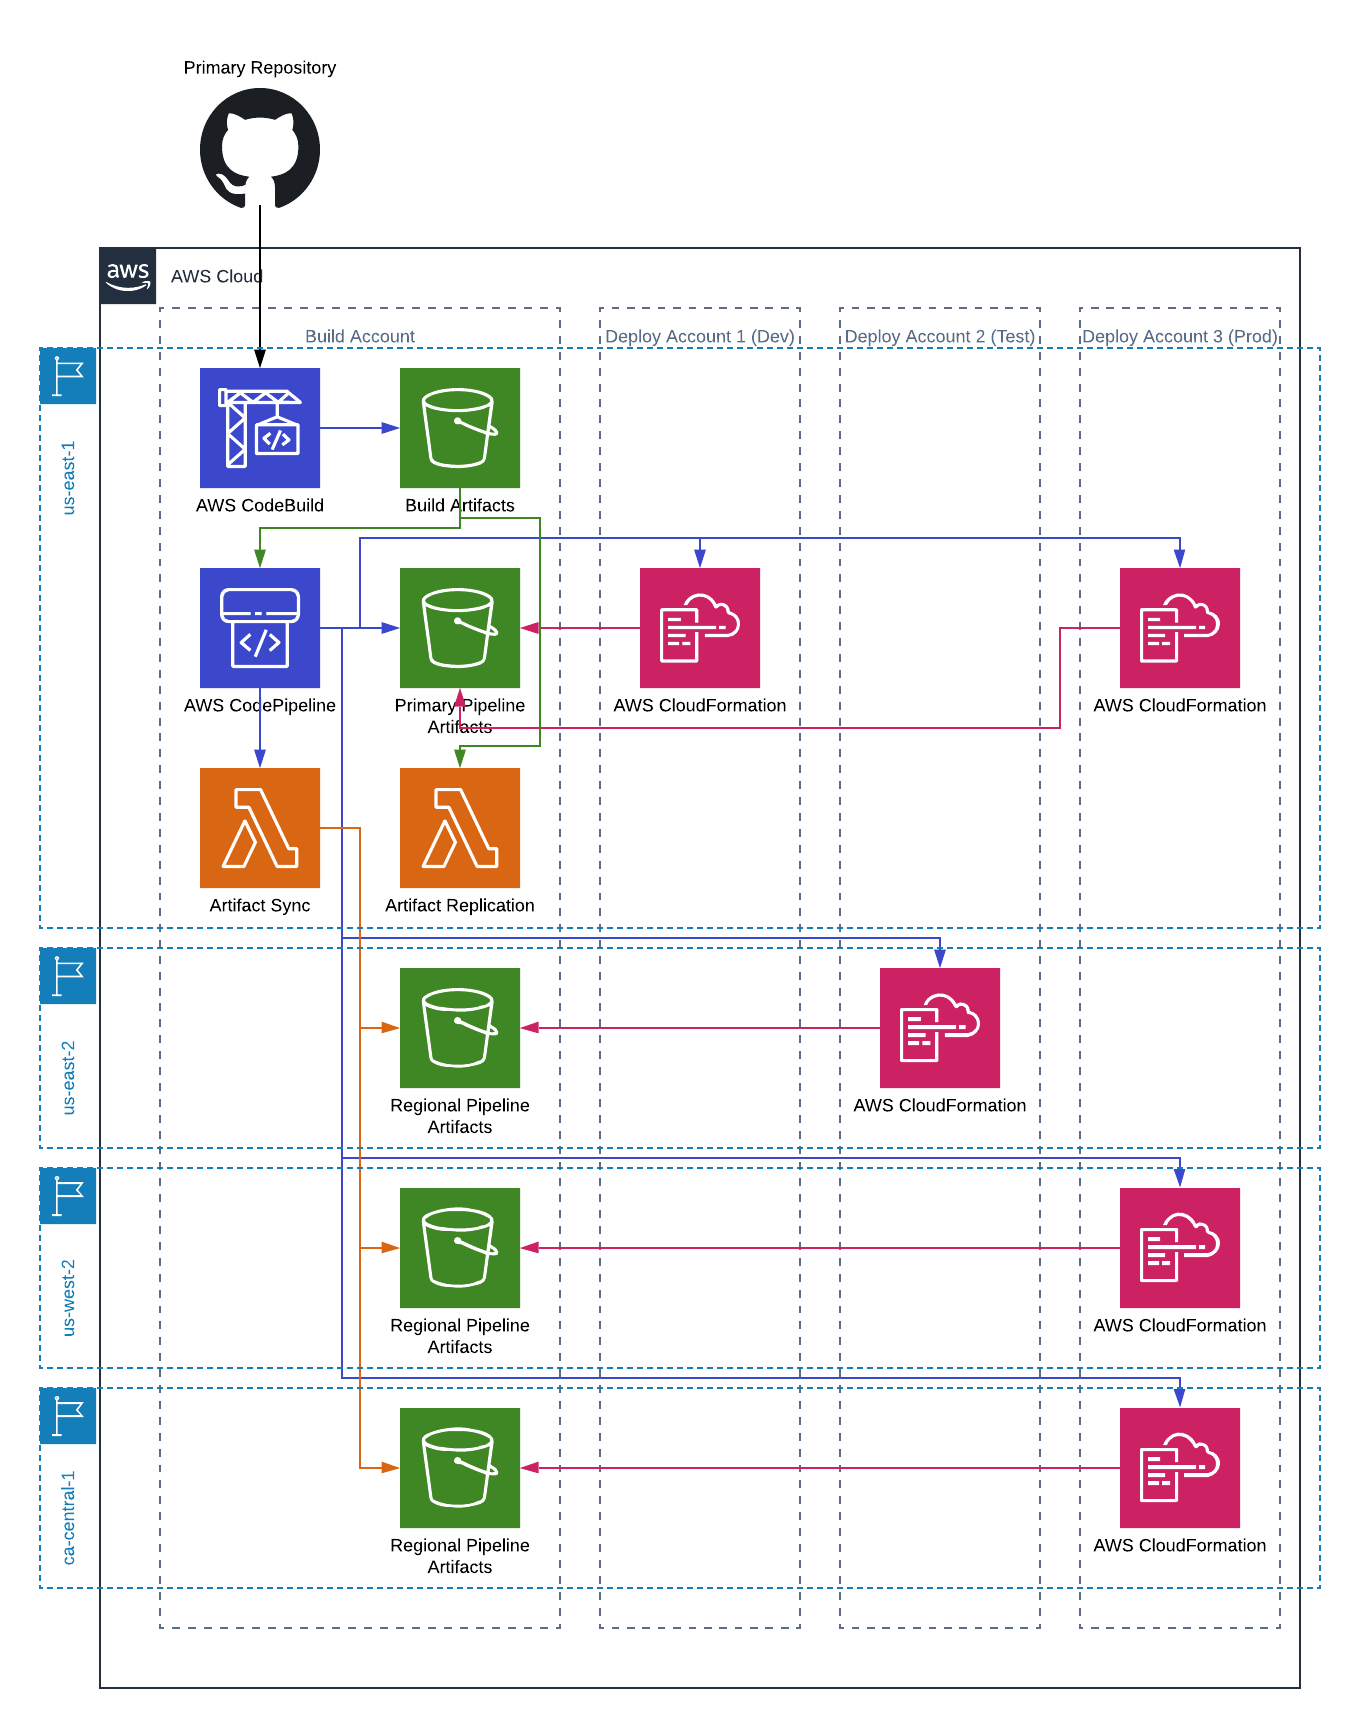
When we’re done, you’ll be able to create pipelines that look something like this:
First, some CodePipeline basics
Feel free to skip ahead if you already have a good understanding of how CodePipeline works.
CodePipeline is basically a workflow system. There are two main concepts, stages and actions. Each stage must complete before the next stage begins. Each action of the same sequence number must complete before the next set of actions can begin.
- Stages are typically logical deployment groupings, though they can be any arbitrary collection of actions. Most pipelines will have a “source” stage, followed by a build stage, followed by a series of “deployment” stages.
- Actions are just what they sound like, they take an action. Actions are of the following types:
Source | Build | Deploy | Test | Invoke | Approval- A source action is what gets things started. There are a few options for your source, including GitHub and S3. Our pipeline will use S3 (we will talk about how GitHub plays into our process later).
- A build action is for building your source. This can be AWS CodeBuild or a number of other, third party, options. We won’t be including a build step in our pipeline (that will be an external process).
- A test action is where you would run tests. This also can be CodeBuild or a number of other AWS and third party options. We won’t be including one of these is our example, but it wouldn’t be a bad idea to do so.
- A deploy action pushes changes to something. There are a number of options for deploy; we will use CloudFormation.
- An approval action stops the pipeline from proceeding until someone manually approves it. HACK: you can automate this approval by use of SNS triggers. Perhaps a post for another time.
- An invoke action calls a lambda function as a part of the deployment. As you can imagine, this can be a powerful feature. We will make use of this to allow our cross region pipelines work.
Some gotchas
This blog post wouldn’t even be necessary if there weren’t some catches with CodePipeline.
The biggest is that CodePipeline doesn’t automatically manage cross region for you. Cross region pipelines were introduced in November, 2018, so they are relatively young. Whilst the pipeline itself can handle running in any region, source artifacts have to be made available in the region you are deploying. The recommended approach is to use S3’s cross region replication. That sounded easy enough until I realized that you can only replicate to one region, and you can’t daisy chain the replications. So, if you only need to deploy to two regions you can make it work, otherwise you’re out of luck.
Configuring permissions for cross account is not simple. Even the reference architecture is hard to follow. I’ll try to simplify it a bit.
Getting started
Before you start building your pipeline there are some things that need to be in place. Consider this the foundation for all your pipelines. Once this is done you don’t need to do it again (though you might need to modify/add to it if you add accounts/regions later).
I’ve created a GitHub repository that has all the plumbing we need, as well as an example project we can actually deploy. You’ll want to clone this repository to follow along.
Step One - Create Your Primary Region Resources
In the first step we are going to create a number of resources in what will be our primary region. This is the region where your build artifacts will live, as well as the location of the pipeline. You don’t have to deploy anything to this region, but you can. I often like to put this in us-east-1 because it’s sort of base camp for AWS. Anything new lands there first. Of course it’s also the region that has the most problems.
To do this you’ll run the CrossAccountPrimary.yaml. HINT: hold of on doing this just yet, I’ll make it easier for you later.
Here are the basics of what we will create:
- Build bucket. This is where all build artifacts go. It will also be the source for pipelines we create later.
- KMS key. In order to facilitate cross account permissions you’ll need to use a customer managed KMS key so you can grant other accounts access to your resources.
- Pipeline bucket. This is what the pipeline will use for it’s artifacts. Even if you aren’t deploying anything to this region the bucket will have the source output(s) in it. It will also be the source of our replication process.
- Lambda function. This function will sync the source data from the pipeline bucket in this region to any regions we are deploying to.
There are some various roles and managed policies that are created as well, and even another lambda that we will use in another blog post.
Step Two - Create Deploy Resources
In each account you are deploying to you’ll need to create a set of roles that can be called by your pipelines to execute the deployment.
To do this you’ll run the CrossAccountDeploy.yaml in each of the deploy accounts. This only needs to be done once per account, even if you are deploying to multiple regions in that account.
The following resources will be created:
- Cross account CloudFormation role and policy. This is the role that will be used in your pipelines to execute the CloudFormation templates.
- Cross account CodePipeline role and policy. This is the role that will be used in your pipelines to run the actions in your pipelines.
Step Three - Update the Primary Stack
The first time you run the primary stack you will have the DeployReady flag set to false. The second time you run it you’ll set it to true, and supply a few other bits of information.
This time through the stack will create a bucket policy on the pipeline bucket that grants the roles created in step two access to the pipeline bucket. It’s important that this be done after the roles have been create because when you specify a principal (role in this case) in an S3 bucket policy the principal must exist.
Step Four - Create Regional stacks
Each region, other than the primary region, to which you will deploy, needs to have some resources created in it.
To do this you’ll run the CrossAccountRegional.yaml in each region.
This will create the following resources:
- KMS key. Just like in the primary region, this is for allowing access to resources across accounts.
- Pipeline bucket and policy. This is a regional version of the pipeline bucket in the primary region. Since the deploy account roles have been created already we can create the bucket policy at the same as as the bucket.
Step Five - Update a Bunch of Stuff
When you create the regional stacks you end up needing to update all the other stacks you created (each of the stacks from steps one and two). Basically you just need to let them know about the new KMS CMKs and bucket(s) you’re adding to the mix.
Simplify
You can follow the readme in the repo and manually create each of the different CloudFormation stacks above, plugging in the correct values from the outputs of the various stacks, or you can use the bootstrap.sh script in the root of the repo to do all of that for you. It will ask for the following:
- Build profile. This is the AWS CLI profile you want to use. For more information about profiles read this.
- Build region. This is the region you want to use for your builds. This is were your pipelines will live as well.
- Build account. This is the AWS AccountId for your builds.
- Account information for each deploy account:
- Account. This is the account to which you want to deploy.
- Region. This is the region to which you want to deploy.
- Profile. This is the profile to use when performing actions on the specified account.
With that information if will build all the stack above and you won’t have to worry about messing something up. Do be sure you have all your profiles in place before you start. And if something does go wrong…well, you’re on your own to clean it up before starting again.
Your Pipeline
Ok, we’ve built the foundation, now it’s time to build your pipeline. You can build your pipeline any way you want, but I’m going to walk you through a concrete example. Along the way I’ll try to point out the things that are important to remember if you are doing something a little different.
GitHub
First you need to get GitHub hooked up. In the example project there is a CodeBuild project that uses GitHub as it’s source. For this to work you must have already created an OAuth connection from AWS to your GitHub account. Specifically you must hook it to the region in which you want to run your builds. For information on how to hook up GitHub to AWS for CodeBuild see this article. The primary thing to do is near the end of the article.
CodeBuild
You’re going to create a CodeBuild project that triggers anytime there is a new pull request in your repository as well as anytime there is a push to master, and will report the results back to GitHub. The project will use the buildspec.yml file in the repository for it’s build configuration. It will have a primary and secondary build artifact as output.
I’ve created the build spec to allow builds to happen when a pull request is created and updated without triggering the pipeline. The secondary output(s) are just a way to show you that you can have more than one build artifact.
Roles
There are two roles that you’ll create in your pipeline. One is for the pipeline itself, the second is for the source.
Pileline Role
The pipeline role is the most complex. It needs to be able to do most things CodePipeline, get information about CloudFormation stacks, pass role to any role used in your pipeline, Decrypt using all the CMKs created in the foundational stacks, read from your build bucket, read and write to/from each of your pipeline buckets, and assume the CrossAccountCodePipeline roles for each account in the foundational stacks.
Source Role
The source role needs to be able to read/write to/from each bucket (build and pipeline), encrypt and decrypt using each of the keys, and invoke the SyncArtifacts function from the foundational stacks.
The Pipeline
This is the part we’ve been working for. The pipeline itself. We’ve done a lot of work to get here, but most of it is foundational, so we won’t have to do it for each pipeline we create.
Artifact Stores
A pipeline needs to know where to get it’s artifacts from. The artifact stores is where the pipeline looks to find out what bucket to use for each region. You’ll specify the bucket name as well as the CMK used for encrypting/decrypting the artifacts.
Stages
We are going to create five total stages, three of them for the deployments themselves (dev, test, prod), one for the source(s), and one for syncing the artifacts.
Stage One - Source
We will have two sources, both from the CodeBuild’s output artifacts. The sources themselves just point to a bucket (the build bucket) and a key (the file that is produced from your CodeBuild step).
Stage Two - Sync Artifacts
This stage is sort of the secret sauce to this whole project. In this stage you’ll have one Invoke action for each region you are deploying to. The action will call the SyncArtifacts lambda function from the foundational stacks and copy the artifacts to the other pipeline buckets. When you have a lambda function that is triggered by CodePipeline it receives various bits of metadata. You’ll get a list of the input sources for the action, which should be the same as the inputs for your deploy steps. The lambda will copy any input artifacts to the pipeline bucket specified in the UserParameters. The format of the UserParameters should be { \"DestinationBucket\": \"RegionalPipelineBucket\" }
Stage Three - Development Deployment
This stage is just a set of CloudFormation create/replace change set actions followed by their corresponding execute change set actions. The important things here are the role used in action (the CrossAccountPipeline role for the account to which you’re deploying), the role used in the configuration (the CrossAccountCloudFormation role for the account to which you’re deploying), and the region (set to whatever region you are targeting).
Stage Four - Testing Deployment
This stage is just like the development stage except that it uses the roles for the testing account, and specifies the region for your testing account deployment.
Stage Five - Production Deployment
This stage is like the previous two, but with an approval action between the create/replace change sets and executes.
That’s it, folks. You now have a complete pipeline that allows you to deploy directly from a build account to any number of accounts and regions. Stay tuned for how to take this to the next level and allow developers to work on a stack in their own account without interrupting everyone else when/if things go wrong.