
Welcome! This post focuses on implementing feature tiers in SaaS applications, rather than payment processing tools like Stripe or Square. If you’re interested in learning about tiers and managing features for different customer levels, read on!
If you are still here, great! Let’s get into what I am going to talk about.
- Why should you consider tiers in your SaaS application?
- How can you manage which customers have what tiers/features?
- How do you add it to your code?
- How do you account for the ”noisy neighbor” problem?
- How do you make sure you’re not losing money?
Let’s get started
What is the point of tiers?
When talking about a SaaS application you’ll often hear about tiers or levels. The idea is simply that you have different features that each tier has access to in your application. Usually, the tiers are progressive, so someone in the second tier would get everything included in the first tier plus something more. Why might you want to include multiple tiers?
Increase Adoption
If you have an application for which you are currently charging money then adding a lower tier, whether free or just cheaper, you can enable increased adoption of your app. That increased adoption enables some of the next points. If nothing else, more people using your app means more people being aware of your app, which is a good thing.
Upsell Opportunities
Whether you’re adding a lower tier to increase the number of users or adding a paid, or higher cost, tier, the point of doing it is to upsell. You have users who are currently using your app; hopefully getting value out of it at whatever tier they are in. By adding another tier you have the chance to convert that user into a paid, or higher-paying, user.
Learning
One thing that is often overlooked when considering a free tier is the value of what you can learn by having more users using your app. If you’ve ever worked in a startup, or just have worked on an app with limited users, you know how challenging it can be to get feedback, and then to understand what value to put on the feedback you get. With a small set of users, you aren’t sure if the request from one or two users is really valuable or just valuable to them. As you increase the number of users in your app you have a chance to hear from a larger audience. That means a bigger sample size and more meaningful data.
Keep this one in mind if you are deciding whether or not to hold on to the lower tier(s) of your app.
It’s also important to always understand your users. Users at different tiers sometimes have different needs. Be sure to weigh your feedback in light of who you are getting the feedback from and test any hypothesis against all of your user personas.
It’s also important to always understand your users. Users at different tiers sometimes have different needs. Be sure to weigh your feedback in light of who you are getting the feedback from and test any hypothesis against all of your user personas.
Enablement
Speaking of understanding user needs, one last point on the “why” of offering tiers is that it can enable you to do things that you can’t do for free, or can’t do at the price of your current app. Imagine you want to add a cool AI feature to your app. It sounds like a great idea, but you quickly realize that giving it away for free is too expensive. By adding a new tier you can charge a fee that makes adding that feature an option. This can be true even if you aren’t looking to make money; you can price it in a way that at least covers the cost.
Tier Management
Now that we understand some of the reasons why you might want to add tiers, how do you manage them?
I’ll start with some things you shouldn’t do…
Don’t Build Your Own Tools
As engineers, we always think we can do that. We’ll look at some problem and decide that it’s not a hard problem to solve and we’ll go off and solve it. Don’t fall into this trap. Engineering resources are precious; spend them on things that add value to your app, your users.
Don’t Make it Complicated
I’m always telling people to stop making things more complicated than it needs to be. Solve the problem that is in front of you, not one that you might have later. This is true with tier management. In its simplest form it’s just a true/false; does this tenant have this tier. It can become more complex later, as you learn, but start simple…always.
There are, of course, some things you can/should do as well…
Do Use 3rd Party Tools
This kind of goes without saying since it’s the opposite of the first don’t I listed, but it’s worth restating and giving some examples. Using tools from third parties means taking advantage of what they have done so you don’t have to do that work. This means you are free to build things that make your app special. I like to use feature flag tools for this. Some examples are LaunchDarkly, Split, and AWS App Config. I can’t say I’ve used App Config, but the principles behind all of these are about the same; you pass in some bit of information and it tells you if the thing is on/off. It’s a simple way to get tier management without a lot of work. Plus, if you aren’t using feature flags in your app already you really should consider them. That’s probably worth a blog post of its own.
Start With Options That Don’t Scale
This is something you’ll hear a lot in the startup space, but it’s true everywhere. When you are doing something new you don’t know how successful it will be. Don’t spend time building things to make your life easier when it does before knowing if it will. It’s okay if the first implementation of your tier management is someone going into your feature flag tool and manually changing values. You can track your billing in Excel when you’re just getting started. Sure, those options are going to be painful if you are successful, but that’s the point when you should increase the automation; not before.
Build As You Grow
Eventually, those things that don’t scale will be pain points, for you and possibly for your users. As that happens start to build. Add something to automatically set values in the feature flag tool using their APIs. Send out invoices automatically with some sort of billing software. Even an internal UI that makes tier management a little easier can be a quick win that improves things just long enough to get to the next level of scale.
How Do You Make It Work?
At some point, you have to start putting something in the code. Here are some things to keep in mind when you do so.
Focus On Features, Not Tiers
We’ve been talking about tiers a lot, but what tiers really are is a collection of features. When you are adding features to your code you should mostly be thinking in terms of those features, not the tiers themselves. We’ve all seen pages that look something like the following:
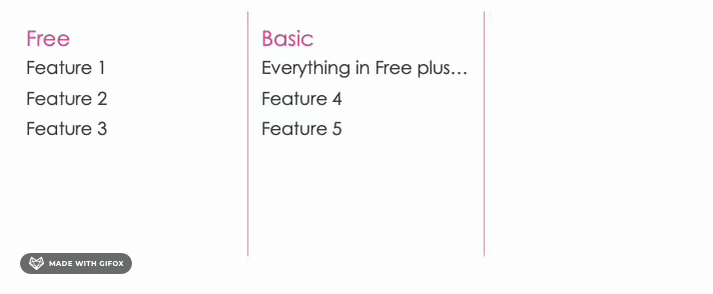
Each tier shows you what features are included. Imagine if you want to move a feature from the basic tier to the free tier. If you focus on tiers then you have to go into the code and make that change. That doesn’t sound so bad, after all, it’s just one feature, so just one place in the code. What if you decided to add a whole new tier? Now you have to find every feature throughout the code and make sure the new tier is included in all the right spots. This makes changing tiers difficult and limits your sales and marketing options.
In addition to allowing you to change tiers, taking a feature-based approach allows you to grandfather in users when you make changes, and even do ala-cart sales where individual features are added for particular customers.
Don’t Confuse Permissions and Features
There is some crossover between permissions and features, so it’s easy to think they can be seen as the same. Both may result in a 403 - forbidden response from an HTTP call, after all. While they do have things in common, they are different.
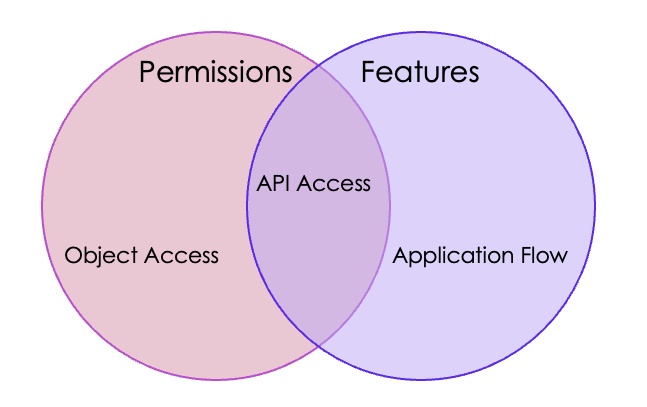
Permissions will often go beyond the high-level “can you access this feature?” and into object-level permissions. A user may be allowed to access the files feature, but may only be able to see certain files.
Features, on the other hand, will often go into application flow. You may have permission to access the search feature, for example, but a feature flag may determine whether you use the standard search or the AI-based search. There isn’t a permission issue, it’s just a different path within the code.
Use Feature Flags
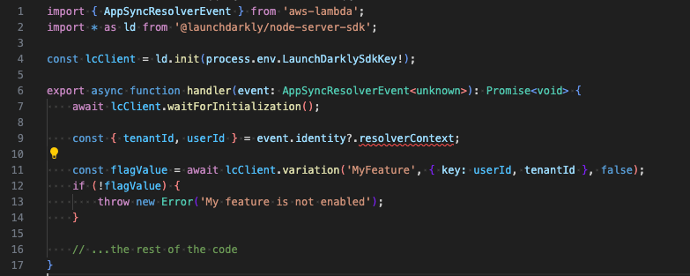
I already touched on this a bit; feature flags are a great way to determine what features a user/tenant can access. The code snippet below shows a quick example of what it might look like to evaluate whether a user can access a particular API. In this example, we have a Lambda function that is being called by AppSync. Our AppSync is using a custom authorizer where we are adding the tenantId and userId to the resolverContext. All the code does is make a call to the feature flag service to determine the flag value for the given context. We use the userId as the key, but the important data point here is the tenantId. That’s the value that we’ll have rules for to determine whether the value is true or false. If it’s false we’ll simply throw an error and we’re done. If it’s true then it does what it would normally do. Again, keep it simple to start with. Many of the feature flag tools have capabilities beyond simple true/false evaluation, but that’s all you need to get started.
Make Sure the UI is Aware
When you’re building a UI that has different levels of permissions it’s a good practice to hide things from users that they can’t do. This limits confusion and generally creates a better user experience. How many of you have clicked a button in the AWS console only to be given an error message saying you aren’t allowed. Not a great experience.
When dealing with tiers and features you want to take a different approach. As we’ve already said, permissions and features are not the same. When you have a feature that is available to the user at a different tier you want the UI to show that to them. That doesn’t mean it should look like you can do something and it will give you an error when you try it. Let’s avoid rebuilding the AWS console experience. But you can grey out a button and show a message when the user hovers over it.
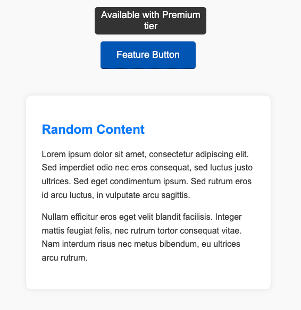
Making sure your UI is aware is how you upsell. You have users in the app who may not realize what additional capabilities your app offers at higher pricing tiers. Tell them!
Dealing With Noisy Neighbors
When you build a SaaS application you’re most often hoping to get some cost benefits from having your different tenants share resources. This creates the opportunity for what is referred to as the noisy neighbor problem. It happens when one tenant is impacted by or is impacting other tenants. In a multi-tier application, this can happen in several ways, and its impact can be made worse when paid customers feel like the free-tier tenants are causing the system to slow down. This is particularly noticeable if you add a free tier and suddenly everything is worse.
There are things you can do to help.
Rate Limiting
There is a reason why every API, every service, in AWS has limits. The main reason is that AWS is IaaS/PaaS. Those share the same noisy neighbor problem as a SaaS app. Rate limiting allows you to limit how much any one user or tenant can use your system. By controlling the rate at which tenants can use your application you can avoid becoming overwhelmed by a single tenant.
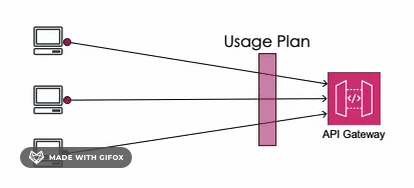
In AWS one way to achieve this is by utilizing usage plans in API Gateway. With a usage plan, you can set the maximum rate for calls with the same API key. The nice thing is that you can have different usage plans so you can have different limits for different tiers. You might want your paid customers to be able to hit your APIs more frequently than the free ones, and usage plans make that easy to do.
If you aren’t using API Gateway (REST API to be specific) your options are a bit more limited. You can get some benefit from WAF, though it’s not really designed to be tenant-based. Still, it can help. Beyond that, you’re mostly on your own. Keep in mind that anything you implement in your code is already sharing some amount of resources. Let’s just hope AWS decides to add it to other places, like AppSync, in the near future.
Segmented Queues
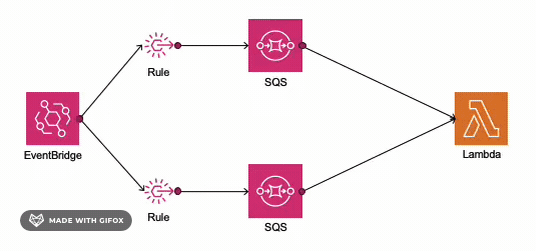
If you’ve ever gone to an amusement park you’ve seen how queues work. You stand in line and wait for your turn. In a SaaS application, you may want to have your paid customers going through a different queue than your free customers. Think of this like the fast pass at an amusement park. The fast pass is still a queue. It goes to the same ride. It just has fewer people in it, so you get your turn faster. You can do the same thing by sending your data to different queues, one for the free tier and one for the paid. The great thing about this is that the same Lambda function is used by both. And because you can set the concurrency at the integration you can have each queue processing messages at different speeds. You can even go so far as to set up a queue for a single tenant.
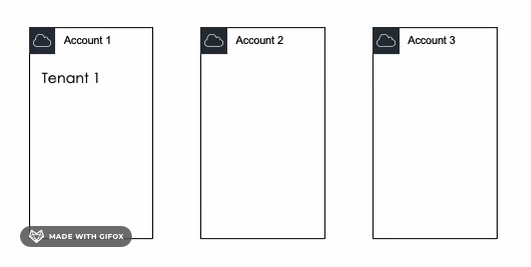
Tenant Partitioning
As your application grows you may want to have a multi-account strategy in place. You may start by thinking you can put all your free tier customers in one AWS account and your paid customers in another. While this strategy does make sure your free tier tenants aren’t impacting your paid tier tenants it does create a couple of issues.
First, it doesn’t necessarily balance the workload. You may have some paid tenants who aren’t doing much and some free tenants who do a lot. You really want a balance so that each account is doing a similar amount of work. That allows you to keep the account settings the same, making it easier to manage.
Second, tenants are, hopefully, moving between tiers (hopefully going from free to paid). If you isolate the tenants by tier you need to have a migration plan in place for when a tenant changes tiers. That can be expensive and complicated, especially if you want the tenant to keep working while you migrate them.
Instead of separating by tier, I like to do a weighted assignment approach. As a new tenant is added to the application the system determines where that tenant should go based on the usage of the current tenants. You can’t know how the new tenant is going to behave but you can at least understand how the existing ones do and use that information to decide where to put a new tenant.
Monitoring
No matter how you decide to manage the noisy neighbor problem the one you you really should do is have monitoring in place. It’s important to understand how your system is behaving at all times so you can make adjustments before your customers start to complain. Monitor things like latency, iterator age, message age, concurrency, and anything else that can impact the performance of your application. Use AWS tools at a minimum.
Understanding Your Cost
Even if you aren’t adding multiple tiers to your app you really should try to understand the costs of each tenant/user. When you’re considering adding tiers, either up or downstream, this information is crucial in understanding how much to charge and what features belong in what tier.
Custom Metrics
You can use the AWS metrics to get a lot of information, but it does have its limits. When you can’t get what you need from the out-of-the-box metrics create your own. Add it anywhere you have a feature that you want to understand better. If nothing else just record that the feature was used. Make sure you are recording metrics for anything that you might want to give away. You don’t want to be surprised by the cost of something you gave away for free.
Include Tier and Tenant
When you are adding your custom metrics be sure to include both the tier and tenant identifier to the metric as dimensions. This will allow you to look at the data aggregated by tier as well as to see how an individual tenant is using your app. It also can allow you to exclude a tenant if you believe their behavior is an anomaly.
Gather Real Use Data
Some APIs, like DynamoDB, return the actual usage with each call. For S3 you can see the size of the objects via EventBridge. Record that information, with tier and tenant added, so that you can see how much things will actually cost. While you can get this information from the generic AWS metrics you won’t be able to see it by tier or tenant.
Recap
There are so many things to think about as you make decisions about adding tiers to your app. We talked about a few key points today:
- Tiers allow you to upsell your app
- Feature flags are a great way to manage tiers/features
- Focus on features, not tiers to allow for greater flexibility
- Don’t forget about your neighbors
- Always be aware of cost
If you want to hear some more thoughts on this topic check out the presentation I recently did on this subject with the #BelieveInServerless group. There was a lot of great discussion that followed the presentation.